Make an Upholstered Headboard You Can Change on a Whim
Classic stripes today, hot pink tomorrow. You can swap the fabric on this DIY headboard to match your room or your mood

“Functional" might as well be my middle name. I usually create furnishings and accessories that serve more than one purpose, or that can be easily changed out for a different look.
After way too much fussing over a complicated jigsaw headboard design, I landed on this two-panel upholstered hanging headboard, which scores big on multiple levels. It’s doable for anyone who can use a staple gun and sew a straight line, it’s pack-and-ship friendly for quick skedaddling, and it has the beefiness of a professionally made headboard.
The best feature of all is the interchangeable pairs of sewn fabric bands you can easily switch at a moment’s notice. And they can be washed or dry cleaned.
If your only upholstery experience has been redoing your kitchen chair seats, and you’ve been chomping at the bit to try a headboard, this is the perfect beginning upholstery project for you — it'll boost your DIY confidence too.
My incentive is always to make something that's one of a kind. Let your inner designer loose. Don’t be afraid to make a mistake, either — almost all upholstery mistakes can be corrected or hidden.
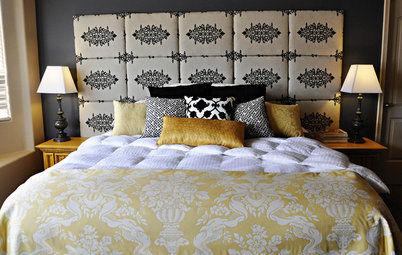
After some experimenting, here's what I came up with. Black and white awning stripes turned on their side — you can't go wrong with this look for spring. The purple box pillows calm it down and heighten the sophistication.
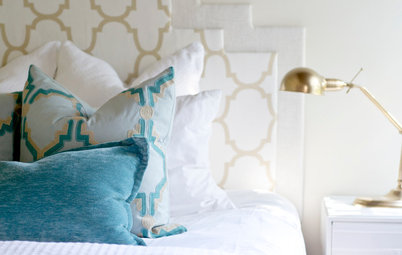
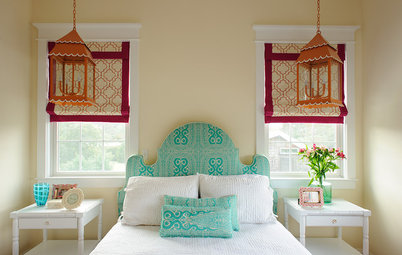
Bright orange is my favorite alternative to red. It's hard to see in the photo, but the headboard fabric has a small raised mod circle pattern, while the two down-filled lumbar pillows are made with a midcentury nubby fabric that adds the perfect counterbalance of texture to the crisp white bed linens.
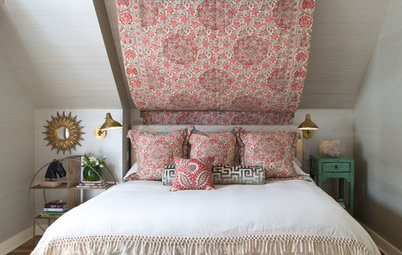
Sweet, soft and feminine never felt so updated. All-natural light blue linen takes center stage on the 43-inch-tall white upholstered panels. These panels are so packable and portable, they're perfect for that big, comfy bed at the cottage.
Tools and materials:
To size your wood, determine the finished panel sizes you want and subtract 1/2 inch from the width measurement. That will allow for the foam and padding in the center of the finished headboard.
I used 1/2-inch plywood for the fronts and 2- by 4-inch pieces for the frame. Next time I'd like to use 1- by 6-inch pieces for the frame instead and increase the foam thickness.
- Drill, bits and chuck
- Measuring tape
- Pencil
- Wood adhesive
- Screws
- Precut plywood (big hardware stores can cut it for you)
- Upholstery foam
- Dacron
- 2 kinds of fabric (for the headboard base and the accent)
To size your wood, determine the finished panel sizes you want and subtract 1/2 inch from the width measurement. That will allow for the foam and padding in the center of the finished headboard.
I used 1/2-inch plywood for the fronts and 2- by 4-inch pieces for the frame. Next time I'd like to use 1- by 6-inch pieces for the frame instead and increase the foam thickness.
Spread wood adhesive or glue on the edges of the plywood panels and press the 2-by-4s onto the edges.
Since I've never had a truly straight plywood piece or 2-by-4, I always use clamps to tighten things up.
After pressing the 2-by-4s in place, I secured the wood with screws.
Oops! Here's a DIY mistake that I made. The first screws I used (2 1/4 inches) were a tiny bit too long, and you could feel them on the plywood front. To fix this, I attached shorter screws on the front side and removed the long ones from the frame side.
How to Add the Headboard Padding
Since the wood was so thick, I got by with using 1/2-inch foam on top of the plywood panel, instead of the 2-inch foam typically used for headboards. Leave the bottom 5 inches of the panel clear of padding so that part will slide right behind the mattress.
Since the wood was so thick, I got by with using 1/2-inch foam on top of the plywood panel, instead of the 2-inch foam typically used for headboards. Leave the bottom 5 inches of the panel clear of padding so that part will slide right behind the mattress.
Attach the foam right on top of the plywood — no rolling down and around the sides.
You can buy Dacron batting from an upholstery supplier, or you can get quilt batting at the fabric store, although it isn't as thick. Dacron provides a friction barrier between fabric and foam, creating a nice foundation for the fabric.
Staple the Dacron batting at the center top of the panel, right at the edge. Don't roll the Dacron over to the back side of your headboard. Stop stapling 4 inches before each corner. Staple out from the center on each side, pulling and stapling as you go. If you lift up the top layer and staple underneath, you'll avoid the dreaded staple dimples that can appear in DIY upholstery.
Staple the Dacron batting at the center top of the panel, right at the edge. Don't roll the Dacron over to the back side of your headboard. Stop stapling 4 inches before each corner. Staple out from the center on each side, pulling and stapling as you go. If you lift up the top layer and staple underneath, you'll avoid the dreaded staple dimples that can appear in DIY upholstery.
Do your best hospital corners, working the Dacron so it's not too bulky there.
Voilà! The Dacron-wrapped panel is ready for fabric.
How to Attach the Fabric
Attached the fabric just like the Dacron, except this time you will actually pull the fabric around to the back side, attaching it with staples about 1 1/2 to 2 inches on the back side.
Attached the fabric just like the Dacron, except this time you will actually pull the fabric around to the back side, attaching it with staples about 1 1/2 to 2 inches on the back side.
Start at the center top and move outward, leaving the corners until all the sides are stapled smoothly in place.
Best upholstery tip ever: Your hand is your best tool. Learn to use it for smoothing and holding fabric in place.
Best upholstery tip ever: Your hand is your best tool. Learn to use it for smoothing and holding fabric in place.
Make crisp and neat hospital corners, cutting out excess fabric inside the fold if necessary.
Here's where you'll cut off the fabric below the padding line on the front.
Use the extra cut strip, if it's long enough, and fold it up and over the Dacron and fabric, lining up the cut edges under the padding line (visible in this photo). Place a small strip of cardboard right along the edge of the padding and staple it to the fabric at a diagonal across the bottom and around both sides.
Now flip the fabric down to cover the wood, neatly wrap it around the bottom of the panel and staple it into place.
Tip: This is the same technique for attaching the back fabric panel on a chair, although it's finished differently.
Tip: This is the same technique for attaching the back fabric panel on a chair, although it's finished differently.
Tip: Always add a time capsule inside your project! You never know who will discover it.
Staple a piece of scrap fabric or cambric on the back of both panels for a professional finish.
How to Do the Sewing
You don't have to have bona fide upholstery tools to do this project, but they do make things easier. I used an upholsterer's electric staple gun, pliers, a staple lifter (a flat-head screwdriver will work), scissors, a drill and drill bits for attaching the hanger pieces, and a hammer to tap in the drywall anchors. A big yardstick is always handy, too.
You don't have to have bona fide upholstery tools to do this project, but they do make things easier. I used an upholsterer's electric staple gun, pliers, a staple lifter (a flat-head screwdriver will work), scissors, a drill and drill bits for attaching the hanger pieces, and a hammer to tap in the drywall anchors. A big yardstick is always handy, too.
Build a French cleat to hang your headboards or purchase the Hangman Hanging System to hang the panels on the wall.
Measure, mark, drill pilot holes and attach the cleat to the back of both panels.
Determine how wide you want your fabric bands — this is what can be switched out to customize your headboard for different rooms and styles. Add 1 inch to your width measurement for a 1/2-inch seam allowance on both sides. I added another 1/2 inch so that when I turn the bands right side out after sewing, no lining fabric will show up on the sides. Make panels long enough to roll around to the back of the headboard at the top of the panel and to attach to the bottom fronts of each panel.
Ye olde pin and stitch. Turn the fabric right side out and press it.
Fold both end edges under 1/2 inch and pin them in place. Stitch the edges of the bands.
Center the fabric panels on the upholstered headboard. Attach the fabric panel starting at the bottom of the headboard. Use cardboard tack strip to start, because it will make a nice edge and it's easier to remove the staples from the cardboard later on. After stapling there, flip the fabric panel up and over the top edge of the headboard.
Roll the panel up over the top, checking the center points, and smooth and pull snugly but not tightly. Staple the panel top on the back side — you can take out the staples later when you want to switch to a new fabric band.
You're finished — phew! Now you need to hang the other side of the cleat to the wall behind your bed to put your new headboard on display.
You're finished — phew! Now you need to hang the other side of the cleat to the wall behind your bed to put your new headboard on display.
The Final Result
Bright and bold pillows give the black and white stripe a completely different feel.
Bright and bold pillows give the black and white stripe a completely different feel.
This is the one that's staying up for now. I feel like I'm sleeping in a boutique hotel.
Soft colors are perfect for the guest bedroom at the cottage.
In my DIY experience, if a project looks like it was hastily whipped up at summer camp, rather than following a well thought-out plan, it's likely to end up in a heap of impulsively concocted flops. Those are time and money wasters. To create a handmade furnishing that's worthy of showing off, set your sights high. That doesn’t mean complicated; it just means a simple, clever, unusual and well-executed design.
And as long as you’re dipping your toe into the world of DIY decor, don’t get skittish about letting your home be an expression of your life at any given time. Ultimately, that’s what makes your home your sanctuary.


Sponsored

Sponsored